Overview
Use repair types in Gearbox to categorise repairs quickly and easily. There are two options for adding repair types: manually through Gearbox settings or using our 'On the Fly' option. 'On the Fly' allows you to add repair types while entering a repair, so you don't need to leave the repair order to add a new repair type in settings.
If “Settings” is not visible in your menu, contact your system administrator to request access.
Adding Repair Types in Settings
1. To add or edit Repair Types, click on your User Icon (1) then click Settings (2)
2. On the left-hand side, scroll down and click on Repair Types (3)
3. From this screen you can Add New Type (4), Merge (5) multiple repair types that might be entered in more than once, Edit existing repair type (6) or Delete (7)
4. Once you have clicked Add New Type (4) you will be taken to a new screen where you can enter the Repair Type (8), Once you have entered your Repair Type, click Save (9)
5. In the event a repair type is duplicated, or a typo, Gearbox provides a merge tool. Click on Merge button then select to Repair Type to be removed on the left and target (Repair Type to keep) on the right, then click Merge Now.
6. Once the Merge is complete the following message will appear:
Adding Repair Types "On the fly"
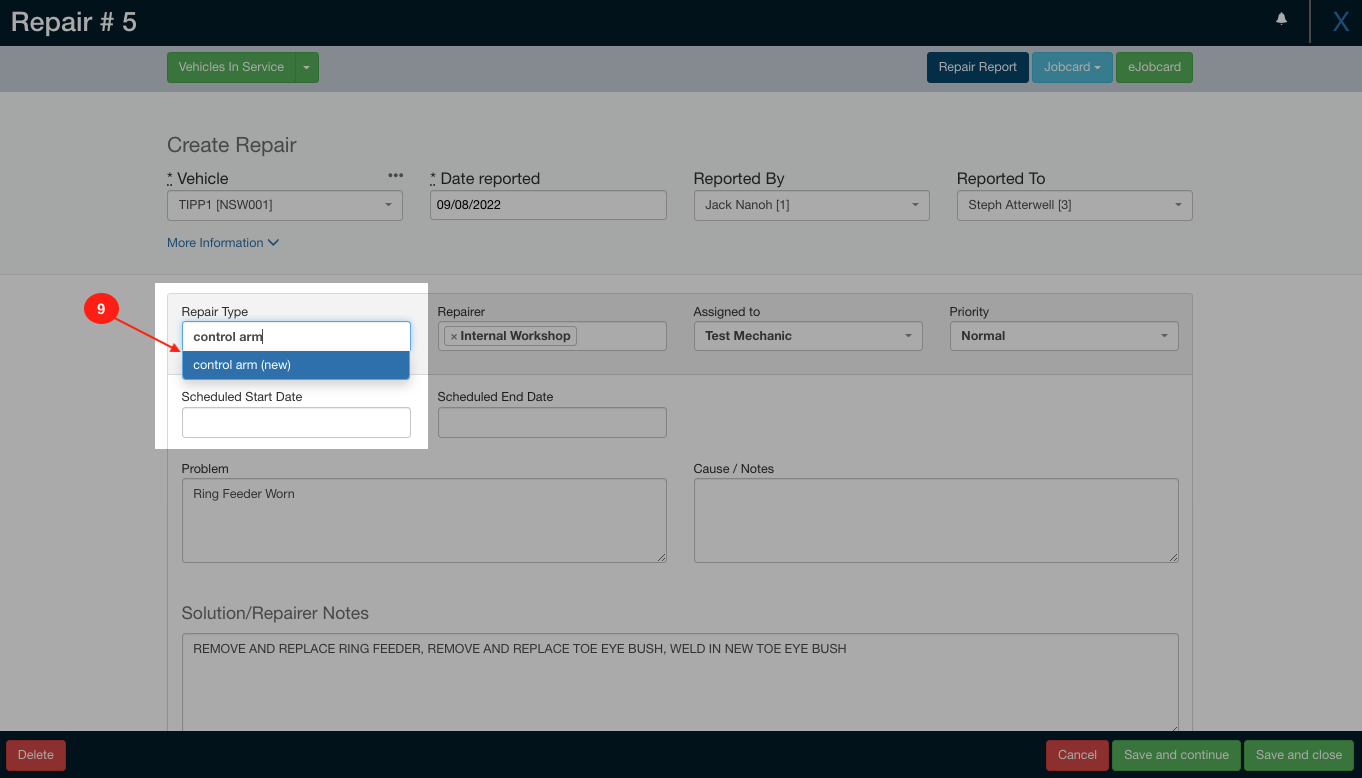
1. Click on Add New (8)
 Repair Types and Settings - Add New Repair
 Repair Types and Settings - (New) 'On the Fly'
2. Under the Repair Type header, start typing in the Repair Type (9), if the Repair Type does not currently exist the system will add “(new)” next to the item you type in, make sure to click on the item in the drop down otherwise when your selection changes it will be removed
Once you have saved the repair, the system will also add the Repair Type to the Repair Type register to be available for future use. This can be completed from many screens, including Tyres, Services etc. The level of users that may create Repair Types on the fly can be configured in settings
Repair (Printed) Jobcard Settings
Repair Jobcard settings can be configured to add extra lines, adding or removing your tyregram, labour hours and sign off.
1. Click on your User Icon (1) then click on Settings (2)
2. On your left scroll down and click on Repair Settings (3)
3. From here you will be able to edit Repair Settings by clicking on the Value (4)
Repair Jobcard Settings
Gearbox Repair Jobcards are highly configurable, you can adjusted these by changing the settings below
- Display Repair Parts (6) - Change the Value (5) from True or False to display parts added on the jobcard
- Repair Blank Lines (7) - Display the number of blank lines required for notes
- Repair Labour Lines (8) - Display the number of blank lines required for notes
- Repair Parts Blank (9) - Display the number of blank lines required for notes
Repair Type On the fly Settings
1. To check if REPAIR_TYPE_ADD_ON_THE_FLY is enabled click on your User Icon (1) then click Settings (2)
2. Click on System Parameters (3), search On the fly (4) Look for REPAIR_TYPE_ADD_ON_THE_FLY (5) make sure the Value (6) is less than 512
To disable the add-on-the-fly feature, set REPAIR_TYPE_ADD_ON_THE_FLY to 512.
The list below shows the various permissions that can be assigned to REPAIR_TYPE_ADD_ON_THE_FLY in settings:
0 = All users can add repair types on the fly
4 = Contractors and above can enter repair types on the fly
32 = Standard users and above can enter repair types on the fly
128 = Managers and above can enter repair types on the fly
256 = Only Administrators can enter repair types on the fly
512 = No users can enter repair types on the fly
Comments
0 comments
Article is closed for comments.